A few acrobatic moves today, but all the needed commands have in some way already been used in previous challenges. Practice makes perfect? right? If you’ve just landed here, I just wish to remind you that you can check the whole AutoCAD series from the start.
Looking at the exercise below, you should be able to form a game plan you will need to get this done with what you’ve already learned.
I believe you possess all the skills you need to complete the following without any issue.
Learning AutoCAD Basics
Figure 1
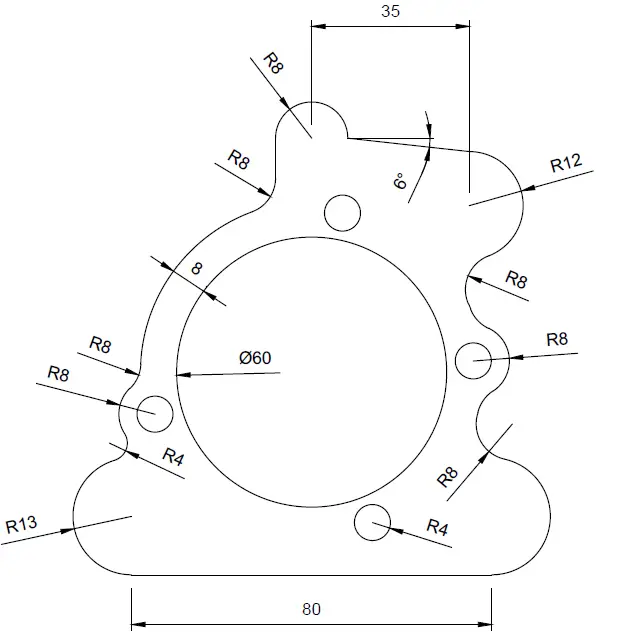
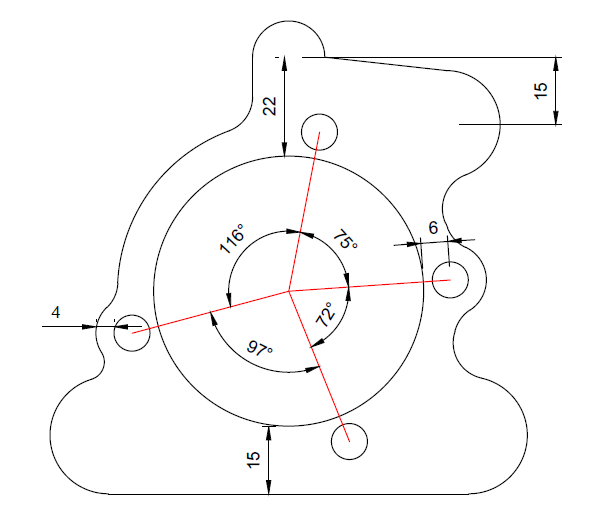
Figure 2
The red lines highlighted below are of equal size. This to say the centers of the small circles are equally further away from the center of the big circle.
Execution
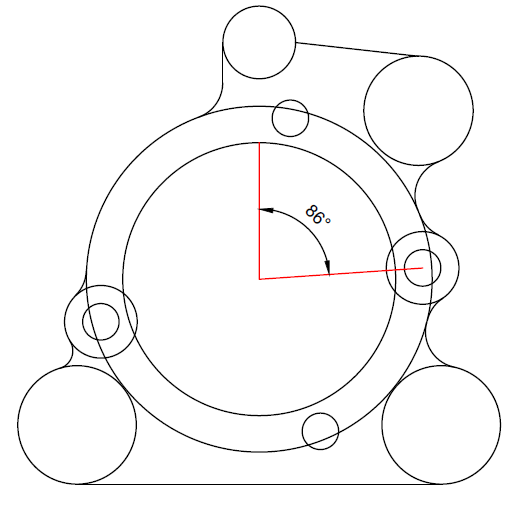
The image above might seem missing some details, maybe the following image will help. Pay attention to the skeleton-image used while creating the project, you will notice this is easier than what it seemed at first.
Our suggestion will be to start from the base line (line of 80 units). All information are provided for this not to be a headache.
Feel free to drop a couple of words below in case of difficulties.
Learn AutoCAD Basics in 21 DAYS
Related posts:
 AutoCAD Tutorial 00: AutoCAD Free Download Full Version
 AutoCAD and its Uses: What is AutoCAD Used for?
 Unique 2D Autocad Exercises to Improve Your Skill Now
 Learn AutoCAD Basics: DAY 4
 Learn AutoCAD Basics: DAY 13
 AutoCAD Tutorial 19: Convert Spline to Polyline
 Save Your Life With the SPHERE Command in AutoCAD
 AutoCAD Tutorial: Breakline AutoCAD
Not sure why this is not working for you as it should. TTR should do!
https://uploads.disquscdn.com/images/f39f2fd57d7fb03a4fa10c3ea4d821f0e26ab567adc7f5e6434f782f4a19fa6c.jpg Dear Andrea,
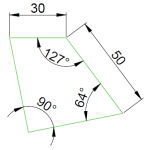
I afraid, your drawing is not accurate. Please see attached picture 🙂
As I learned at school, one drawing should give an idea about a subject. If
something supposed to be tangent to another object it should be shown on the drawing
(red lines on attached picture). The same if something is in line or symmetric.
Beside of it, one dimension given by you is wrong / not accurate (marked by
circle on the picture). I hope, you agree with me.
Thanks for a very good course 🙂
Thanks a lot for your input. I will look into it and update the post if necessary.
How did you get the 86%? Please help