The command prompt has become more useful in the present version of AutoCAD and knowing how this work can drastically help you level up your AutoCAD skills.
Almost all commands have an equivalent icon to activate it, and it is not necessary to remember what a command is, but there are situations where you will need to interact with the software while using the command prompt.
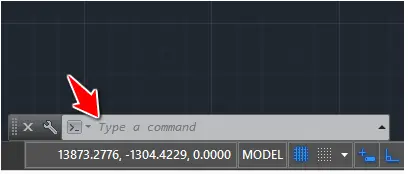
The command window is the windows below the drawing area. It has become a little smaller in today’s version of AutoCAD.
How will a command prompt help me?
The command prompt can help quickly activate a command, and mostly help to access sub-features of commands as you will notice in a minute.
How to use the command prompt in AutoCAD
To draw a line in AutoCAD, what you do first, is click on the LINE icon to activate the LINE command, you can instead of doing this write LINE in the command prompt and hit ENTER on your keyboard to activate the command.
Example
Drawing a circle
We have learned how to draw a circle in AutoCAD the easy way, This example is meant to help illustrate how sub-features of a command can be accessed from the command window.
Step 1
Type CIRCLE and hit Enter
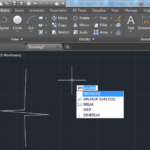
The following appears
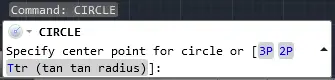
The default action you need to execute is to specify the center of the circle you want to draw, you can do it by simply making a click on the drawing area.
There are also some other features you can make use of. [in brackets]
Notice on the picture the sub-features written in blue where 3P helps you create a circle using 3 points of the circumference, 2P does the same as 3P but with 2 points and Ttr helps create a circle with a specified radius and tangent to two objects.
To activate the sub-feature Ttr for example, you will have to write the letter in blue (or the whole word) and hit Enter.
Step 2
Specify the center of the circle by a click on the drawing area.
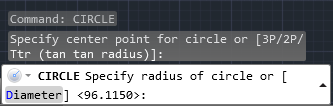
As soon as you specify the center of the circle, you are prompt to specify the radius of the circle.
Step 3
Type D and Hit Enter

Step 4
You now see AutoCAD is no longer requesting the Radius, but the Diameter. So we bypassed the radius step and told AutoCAD we would instead like to specify the diameter, and all was done using the command line.
At this point, you can type 5 and hit Enter, and 5 units will be the Diameter of your circle.
Final Words
This has been some fundamental illustrations of how the command area works in AutoCAD. If you have not grasped it well, do not worry, we will come back to it later during application exercises.
Quizzes
Practice Exercises
- Learn AutoCAD in 21 DAYS | Great series to help you learn AutoCAD 2D
- AutoCAD exercise 00
- AutoCAD exercises
- AutoCAD exercise 01
Related posts:
 AutoCAD Tutorial 00: AutoCAD Free Download Full Version
 AutoCAD and its Uses: What is AutoCAD Used for?
 AutoCAD Tutorial 16: Chamfer and Fillet command in AutoCAD
 Learn AutoCAD Basics: DAY 5
 Learn AutoCAD Basics: DAY 14
 AutoCAD Tutorial 19: Convert Spline to Polyline
 Save Your Life With the SPHERE Command in AutoCAD
 AutoCAD Tutorial: Breakline AutoCAD