The following exercise forces us to use the TRIM and the CIRCLE command in AutoCAD.
You might benefit from learning how to use these commands beforehand.
Exercise
In the previous session, we learned how to use the LINE command. Those techniques will help you a great deal here.
Learning AutoCAD Basics
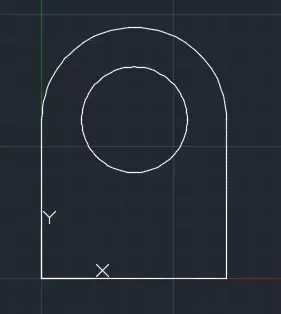
Here is the rough image you should strive to reproduce.
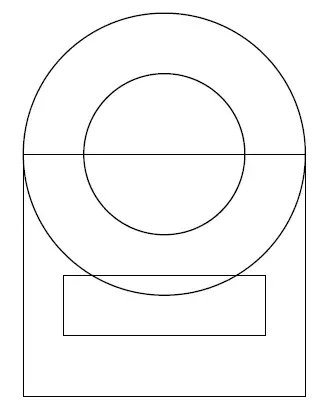
Two circles and two Rectangles.
What is the easiest way to get to this?
- Create the big rectangle using the LINE command
- Use the Center on the top side of the triangle to create the two circles.
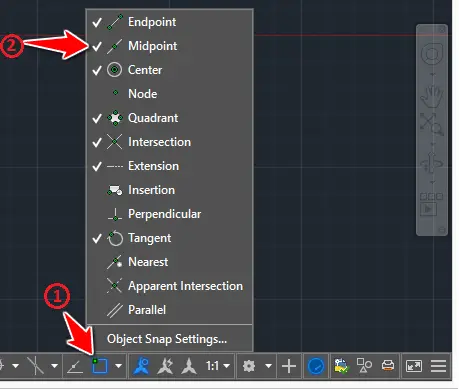
For step 2, you need to turn the Midpoint ON if you want to be able to find the center of that segment while creating the circle.
Here is how to do it (right-click on 1 and tick 2)
Now, you should be at the following point
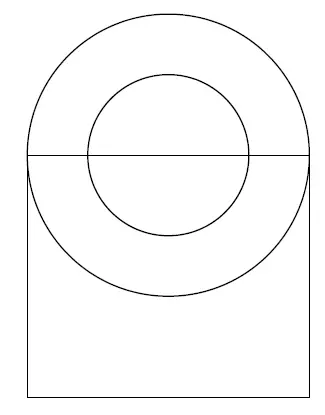
Trim the big circle and Erase the top side of the rectangle

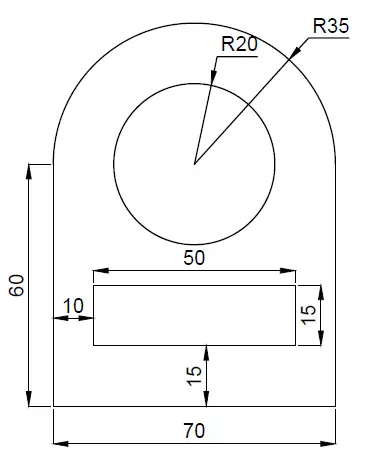
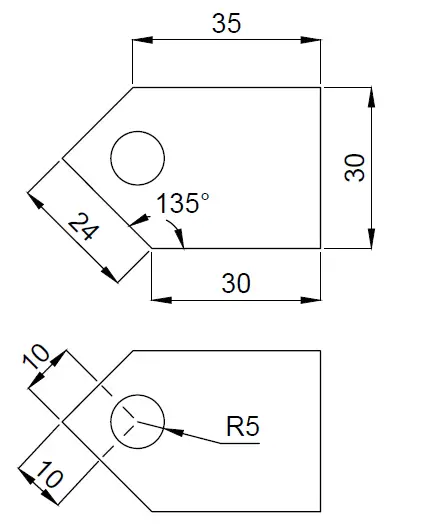
Now, all we need to do is create a small Rectangle. Given the dimensions above, if we consider that the left corner of the figure is at the point of coordinates (0,0), we need to start the small rectangle at the point of coordinates (10,15)
What we will do.
- Move the UCS to the left-down corner of the figure.
- Start the line at the point (10,15)
How to move the UCS to the left-down corner of the figure
- Type UCS
- Select the point
- Move the cursor in the x-direction and click
- Move the cursor in the y-direction and click
This is what you are supposed to get
Notice the UCS

Now, you can quickly start the line at the point (10,15) and create the small rectangle.
Exercise
If you are confused about this, leave a comment below, and I will have no problem explaining it further.
Learn AutoCAD Basics in 21 DAYS
Related posts:
 AutoCAD Tutorial 00: AutoCAD Free Download Full Version
 AutoCAD and its Uses: What is AutoCAD Used for?
 Unique 2D Autocad Exercises to Improve Your Skill Now
 Learn AutoCAD Basics: DAY 5
 Learn AutoCAD Basics: DAY 14
 AutoCAD Tutorial 19: Convert Spline to Polyline
 Save Your Life With the SPHERE Command in AutoCAD
 AutoCAD Tutorial: Breakline AutoCAD
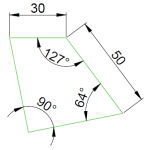
Ups! a slight mistake happened while I was setting up this exercise which I’ve just noticed. Normally that 92° angle should be 90° allowing other methods to be used, just like on the image below (considered the angle is 90°), you would just have to create the little square and use its appropriate edge as the center of the circle.
With that being said, the only method is most probably UCS
Sorry, only two angles are right angles
Correct ! That angle to the right is slightly different from 90 degrees. I might consider redesigning this exercise though the focus point here is to use the UCS command.
Check the comments below!
what is point A?