The LINE command and the PLINE command in AutoCAD are used exactly with the same steps. Consequently, it is hard for a CAD beginner to fully grasp the need to ever use one to the detriment of the other.
In this post, we will look into a very basic example where the use of the PLINE is preferable, all this for the simple reason that you need to start using commands taking into account the final aspect of the project you are working on and using the shortest way as often as possible.
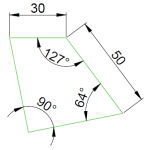
Let’s use the following image, the initial object being on the left and the final object being on the right.

As you can see, we need to OFFSET the outer object with a specific length to get the inner object.
Polyline vs Line
Using the LINE command
Step 1
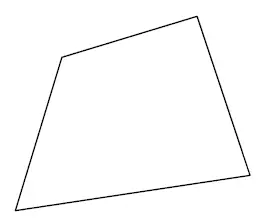
If you are using the LINE command, the first step will be to get the following object created.
Step 2
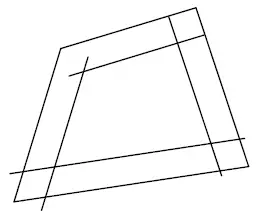
Then you will need to OFFSET each side of the object, which will give you the following
Step 3
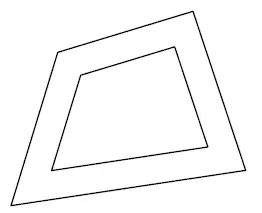
And lastly, you will have to TRIM unwanted ends to end up with the final product.
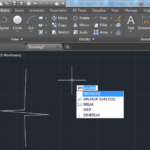
Using the PLINE command
Step 1
Using the PLINE command will take you the same time and effort as it did using the LINE command to create the following
Step 2
And the simple action to take next is to use the OFFSET command
And the Good part about this is that you will use the OFFSET command only once to created the inner image.
The second method is way quicker than the first method. Here is one of the few AutoCAD tips you will want to make use of frequently to train this habit.
Learn AutoCAD Basics in 21 DAYS
- Learn AutoCAD – Day 1
- Learn AutoCAD – Day 2
- Learn AutoCAD – Day 3
- Learn AutoCAD – Day 4
- Free AutoCAD Tutorial Courses
- AutoCAD tutorial – Tips and tricks
Related posts:
 AutoCAD Tutorial 00: AutoCAD Free Download Full Version
 AutoCAD and its Uses: What is AutoCAD Used for?
 Unique 2D Autocad Exercises to Improve Your Skill Now
 Learn AutoCAD Basics: DAY 4
 Learn AutoCAD Basics: DAY 13
 AutoCAD Tutorial 18: Basics of Annotation in AutoCAD
 Save Your Life With the SPHERE Command in AutoCAD
 AutoCAD Tutorial: Breakline AutoCAD