In this AutoCAD tutorial, we have learned how to grow an array on an ellipse. Today we are going to combine that skill with others.
That being said, we suggest you master the tips we share on DAY 12 and the use of the ARRAY command in AutoCAD before trying this one out.
Learning AutoCAD Basics
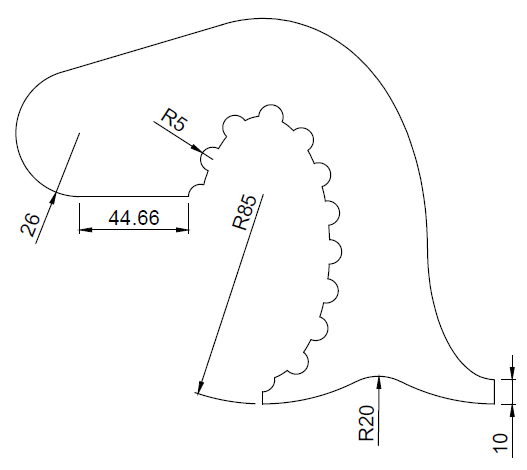
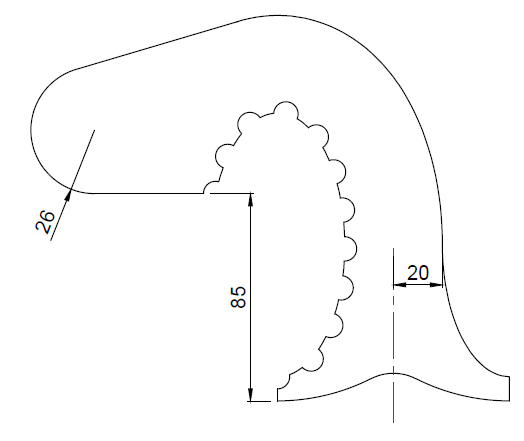
The following is the image of today’s experiment.
Execution
Now, we would love to provide the following images. These will lessen your confusion and help you know where to start.
Notice an ellipse of 55 x 108 in the figure below, it is what you have to use to create the array. Those small circles are equally spaced around the path of the array.
The center of the Big circle is shown on the image below and denoted by A.
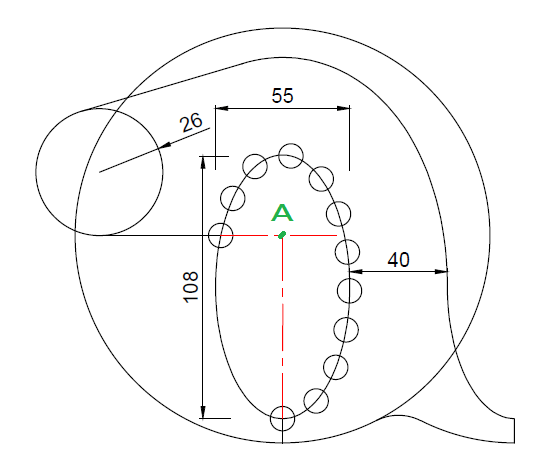
The following image gives a dimension that will be important while designing.
The red line on the last image shows a line of symmetry that will be used to get the down part of the object completed.
If this is confusing, I will invite you to check how to build such an ARRAY here.
Note you will be required to use the OFFSET command in this exercise.
Learn AutoCAD Basics in 21 DAYS
- Learn AutoCAD – Day 17
- Learn AutoCAD – Day 15
- Free AutoCAD Tutorial Courses
- AutoCAD tutorial– Tips and tricks
Related posts:
 AutoCAD Tutorial 00: AutoCAD Free Download Full Version
 AutoCAD and its Uses: What is AutoCAD Used for?
 Unique 2D Autocad Exercises to Improve Your Skill Now
 Learn AutoCAD Basics: DAY 4
 Learn AutoCAD Basics: DAY 13
 AutoCAD Tutorial 19: Convert Spline to Polyline
 Save Your Life With the SPHERE Command in AutoCAD
 AutoCAD Tutorial: Breakline AutoCAD
Hi there,
I am stuck on the final part which requires to trim the array. But from what I have found it is not possible to trim the array. Although I have found that I can trim the ellipse but it results in the array being moved. Is there a way in which this can be done?
Thanks
Hello Andreea. Sorry i m bothering you again. I cannot seem to find how to do the down part.
Just Use the MIRROR command, and replicate that line you’ve already created. Use that vertical line as the center line or you MIRROR. Then you can FILLET the intersection with R20
Hope this will help
Yes that helped me to figure it out. I already knew that i had to use mirror that way but i couldn’t find the way to do the highlighted part. If i got it right now i basically have to mirror the big circle as well and then use the fillet to create it. Am i right or you did other way?