Just looking at the image below makes me happy, and I bet you will understand this after completing the challenge below.
As a reminder, I would like to give you the following tips, just in case you need it.
- You need to have mastered the use of the MIRROR command. Using it will save you a headache. After creating those arcs, use the MIRROR command to create a mirrored copy on the other side. The red lines can serve as a midline for your MIRROR.
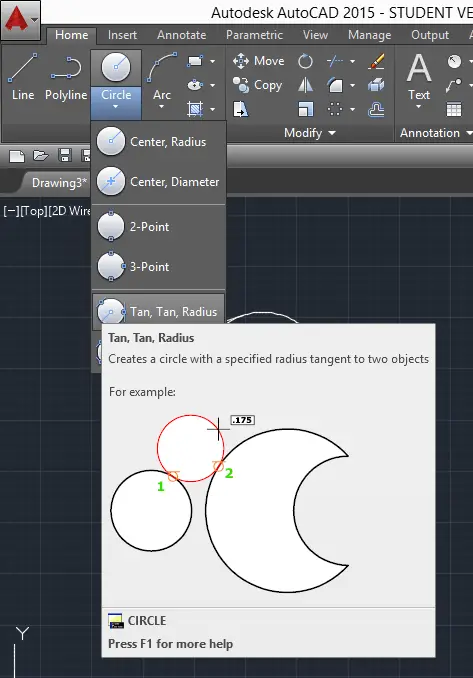
- To create the arcs, you need to use the feature Tan Tan Radius of the CIRCLE command. If this is the first time you hear about this, you should go and check it now.
Learn AutoCAD basics
Figure 1
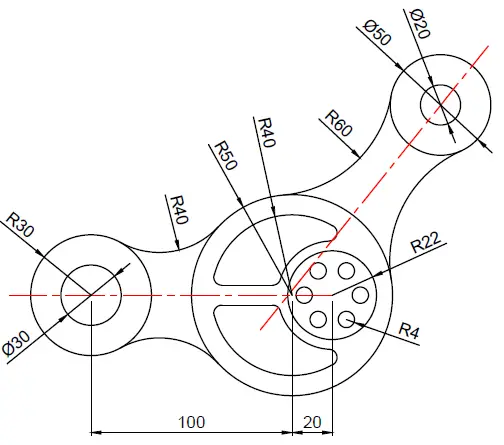
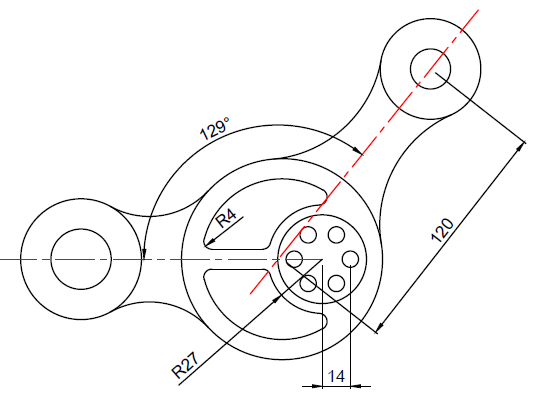
Figure 2
To avoid the preceding image to be too bushy, I’ve split information. You can find the remaining part of the information you need in the following picture.
Hopefully, all went fine, if not, feel free to drop a couple of words below and share what your concern was while working on this challenge.
Learn AutoCAD Basics in 21 DAYS
- Learn AutoCAD – Day 16
- Learn AutoCAD – Day 18
- Free AutoCAD Tutorial Courses
- AutoCAD tutorial – Tips and tricks
Related posts:
 AutoCAD Tutorial 00: AutoCAD Free Download Full Version
 AutoCAD and its Uses: What is AutoCAD Used for?
 Unique 2D Autocad Exercises to Improve Your Skill Now
 Learn AutoCAD Basics: DAY 4
 Learn AutoCAD Basics: DAY 13
 AutoCAD Tutorial 19: Convert Spline to Polyline
 Save Your Life With the SPHERE Command in AutoCAD
 AutoCAD Tutorial: Breakline AutoCAD
Hi,
It went well it went actually quicker than i expected. My only question is where the middle fillets are i can’t find the distance between the horizontal parallel lines. (i used the radius of the small circle to offset from the centre line.
You did the right thing.