Welcome to the inaugural installment of our series: “Mastering AutoCAD Basics in 21 Days.”
Throughout this series, we’ll break down 21 CAD exercises into individual posts. By the end of this journey, you’ll possess the fundamental knowledge of AutoCAD 2D, empowering you to tackle complex projects with confidence.
If you haven’t downloaded the latest version of AutoCAD yet, you may qualify for a free license today. Autodesk offers free access to AutoCAD for students and aspiring instructors. Here are the instructions on how to secure your free AutoCAD download if you fall into either of these categories. Let’s embark on this learning adventure together!
Learning AutoCAD Basics
Let’s begin with the essentials for Day 1. It’s crucial to familiarize yourself with these commands before proceeding further. If you’re confident in your ability to navigate the upcoming content independently, you can skip this step and continue reading below.
Coordinate system
Within AutoCAD, the Drawing Area consists of a sheet where each location possesses distinct coordinates represented by x, y, and z.
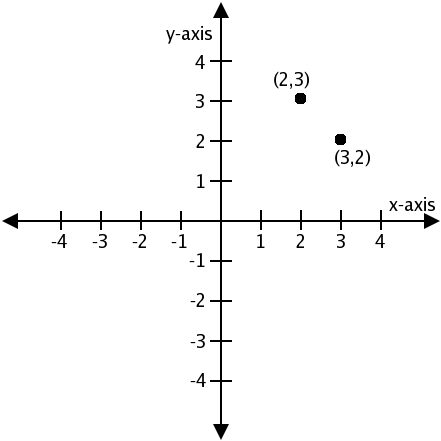
As we exclusively focus on 2D work in this series, the z component of the coordinate system becomes irrelevant.
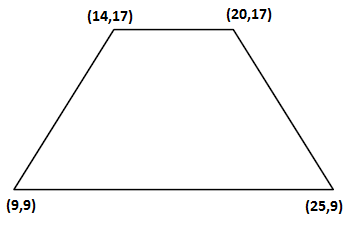
Examining the image below, you’ll observe that each corner of the figure is associated with coordinates.
Though it is true that you probably won’t be using this a lot while drawing in AutoCAD, we will spend a minute talking about it. At this point, I will suggest you disable the Dynamic input before trying the following.
We will attempt to recreate the earlier image using the coordinate system and the command window. The process is straightforward – the idea is to utilize the four points to draw the quadrilateral.
To do that using AutoCAD:
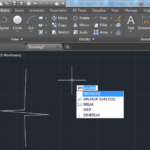
The first step allows activating the LINE command. (Learn more about the LINE command)
The second step allows specifying the starting point of the line and the same goes for next steps.
The last Step allows canceling the LINE command.
In AutoCAD stroking Esc (ESCAPE) allows exiting a command.
At this stage, you are not using the computer mouse, and you are required to pay close attention to the command windows while drawing. As we go, we will learn more about the command windows and how to use your mouse in AutoCAD.
Exercise
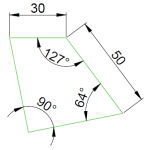
Use the technique we have just learned to create the following.

Note you can start from any point.
If you find any aspect confusing, feel free to leave a comment below. I have no problem providing further clarification.
Learn AutoCAD Basics in 21 DAYS
Related posts:
 AutoCAD Tutorial 00: AutoCAD Free Download Full Version
 AutoCAD and its Uses: What is AutoCAD Used for?
 Unique 2D Autocad Exercises to Improve Your Skill Now
 Learn AutoCAD Basics: DAY 5
 Learn AutoCAD Basics: DAY 14
 AutoCAD Tutorial 19: Convert Spline to Polyline
 Save Your Life With the SPHERE Command in AutoCAD
 AutoCAD Tutorial: Breakline AutoCAD
I have no idea what I’m doing wrong but the shape I’m getting does not resemble that above. I seem to be having the same problems as everyone else here. I’m using the 2017 student version and I can’t even get a simple square when following directions. I’m doing exactly what I’m told but it just isn’t working out.
Move to the next session if possible. We are looking into this and will bring an update to the article in the coming days.
It seems like this site will be very very helpfull I realy appreciate you all.Thanks for the first day.
Thanks for stopping by. 🙂
is there any way to avoid having to enter # before every set of coordinates?
p.s.: Merry Christmas