
The Arduino is a quite versatile board from which a lot of great ideas and fun can come from. For this project, we are not going to push past using a single Arduino board. Let’s make two Arduino board exchange information between them.
The easiest way for Arduino to Arduino communication is by using the USART or I2C but we won’t use these methods since we want to be able to have a wireless communication here.
There are a lot of radio boards on the market making not a bit deal to add wireless abilities to your projects. There are a lot of restrictions when it comes to radio communication and you are not allowed to transmit on any frequency. You need to make sure the frequency range you will be using is allowed.
In this project, we will use the most popular, cheapest and easiest-to-use sensor that let us transmit data one way from one Arduino board to another at 433MHz.
There are some libraries that let you send data using these devices, but some of them are no longer supported and are hard to use. That’s the reason why in this tutorial we will transmit data with a PWM signal. By applying HIGH state to the data pin of the module, we send the HIGH state to the other Arduino. That lets us measure the time of the HIGH state on the receiver side with the pulseIn method. In this tutorial, we will control the brightness of the LED remotely with two Arduino boards and the radio modules.
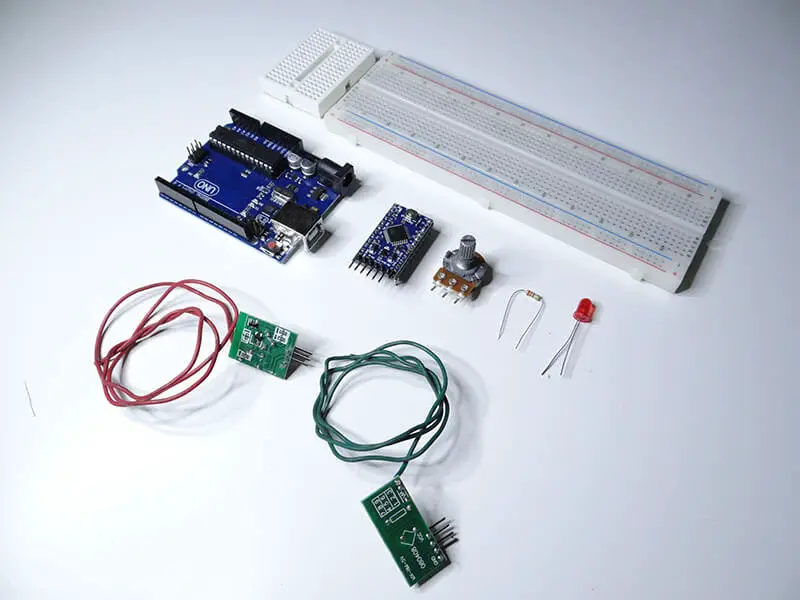
Here is what we will need:
- 2 x Arduino boards
- 1 x 433MHz radio module (receiver and transmitter)
- 1 x LED
- 1 x 220 Ohm resistor
- Jumper wires
- 1 x Potentiometer
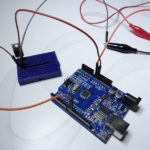
To make those radio modules work with less noise you should solder two wires that will act as antennas to the boards as you can see below. Sometimes, it is even impossible to get them working without antennas.

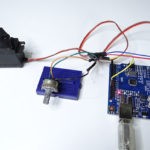
Since we need two Arduino board, I will use the Arduino UNO and the Arduino pro mini. The Pro mini is cheaper than the UNO but you need an external converter to program it. Below you can find two schematics of the circuits. The Arduino pro mini has the receiver and the Arduino Uno is connected to the transmitter. On the receiver side, you can find two data pins, they are connected together which means using anyone of them will do.


The best way to use the Arduino pro mini is to plug it into the breadboard and then connect the cables to it. I also suggest using a breadboard to connect the potentiometer to Arduino Uno.


Below you can find a few lines of code that will do the job. That’s for the transmitter. It simply reads data from the analog pin A1, maps the value to match the PWM width and it is set to the pin of the Arduino and then our radio module constantly sends this value to the receiver.
void setup() {
pinMode(9, OUTPUT);
}

void loop() {
analogWrite(9, map(analogRead(A0), 0, 1023, 7, 128));

}
Here is code for the receiver, it reads the length of the HIGH state on the pin that the pin DATA of the receiver is connected to, then maps this value to match the PWM signal and sets it to the LED.
void setup(){
Serial.begin(9600);
pinMode(9, INPUT);
pinMode(10, OUTPUT);
}

void loop(){
long pulse = pulseIn(9, HIGH);
analogWrite(10, map(pulse, 80, 2000, 0, 255));
Serial.println(pulse);
}
As simple as that and the good news is it works great.
Here is where to check our other Arduino projects.
You might also like:
- Arduino hx711 tutorial
- Arduino magnetic switch
- Best Arduino Kits
- gifts for engineering students
- gifts for engineers
- mpu6050 Arduino projects
- Current sensor Arduino
- Soil Moisture Sensor With Arduino
- Arduino Count up Timer Using the Nokia 5110 LCD
- Arduino Yun: Integrating or Juxtaposing Arduino with Linux
- Arduino Projects: Line Follower Robot
- Arduino RFID Project for Beginners
- Arduino MOSFET Project
- Which Arduino Should You Buy
- What Can You Do With Arduino Boards?
- Great Alternatives to the Arduino Microcontroller
- Arduino Projects: Color Sensor
- Arduino IDE Alternatives
- Arduino Mega vs. Uno
- Arduino Projects: Arduino LCD Display
- Read Arduino Rotary Encoders
- A Selection of the Best Arduino Simulators
- Arduino Projects: IR Receiver
- Arduino Light Sensor Project
- Arduino Projects: Arduino Decibel Meter
- Arduino Stopwatch Project
- Arduino Bluetooth RC Car Project
- Arduino Temperature Logger Project
- Arduino Projects: Arduino 7 Segment Display
- Arduino Projects: Clap ON Clap OFF Light
- Arduino Relay Project
- Install a Library Onto the Arduino IDE
- Arduino Projects: Rainfall Detector
- Arduino Projects: RGB LED Arduino
- Arduino Stepper Motor Project
- Arduino Projects: Arduino DC Motor Control
- The Top Affordable Arduino Robot Kit
- Arduino 3D Printed Case
- Arduino Projects: Asynchronous LEDs Blink
- Arduino Projects: Ultrasonic Distance Sensor
- Arduino Projects: LED – 4X4X4 LED Cube
- Arduino Car Projects: Build an Obstacle Avoiding Robot With Less Than $30
- Arduino Projects: Servo Potentiometer Control
- Arduino LED Project: Knight Rider
- Arduino Projects: PIR Motion Sensor
- Arduino vs Raspberry Pi
- Top 9 Books Every Engineer Should Read
- Top Used Sensors for Arduino
- First Hand on the Arduino Uno Board
Related posts:
 Arduino Projects: Building an Arduino Countdown Timer
 Arduino Projects: LED – 4X4X4 LED Cube
 Arduino Projects: PIR Motion Sensor
 The Best Arduino Starter Kits
 Arduino Relay Project
 Arduino Projects: Building a Mini Arduino Shield With KiCAD – Part 1
 Arduino MOSFET Project
 The Top Alternative IDE for Arduino You Should Start Using Today