The Knight Rider is one of the perfect Arduino projects for beginners. What is Knight Rider? It’s a set of LEDs that blinks one after another, Here is what the official Arduino page says:
We have named this example in memory to a TV-series from the ’80s where the famous David Hasselhoff had an AI machine driving his Pontiac. The car had been augmented with plenty of LEDs in all possible sizes performing flashy effects.
So, we will make a blinking set of LEDs. You can find the code to make the Knight Rider on the Arduino page. Here we will attempt to show a simpler and shorter code. I will do a 10 LED version of it.
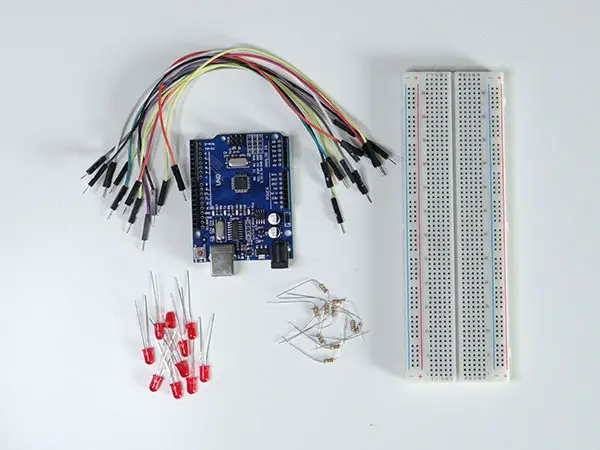
Let’s start with what we will need for this project, if you bought one of those Arduino starter Kits, you should find each of these components in the box:
This project will particularly help you learn to use LEDs with Arduino and how to use for loops.
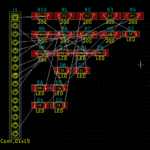
The first thing we have to do is connect everything together, below is a schematic with all the connections. I used 220Ω resistors but 200Ω resistors can work for this project as well.
Some people say you don’t need to use a resistor when connecting LED to Arduino, but that is not true. You always have to use a resistor when connecting LED to Arduino otherwise you can damage your Arduino and LEDs. So remember this: Whenever there is an LED, there must be a resistor.
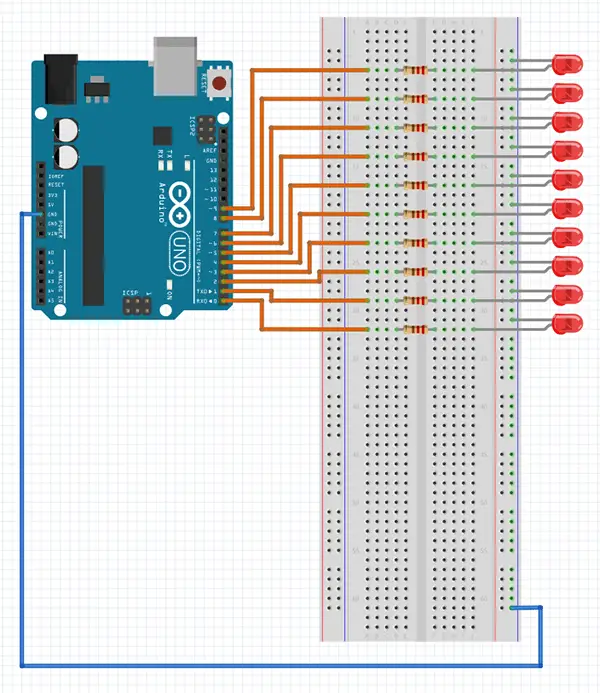
Put the negative leg (shorter one) of the LED in the negative bar of the breadboard and the positive leg in the breadboard row. then connect the resistor to the LED and the resistor with the Arduino using a male-male jumper wire. Do the same for all 10 LEDs. Don’t forget about Connecting the negative bar to GND of the Arduino.
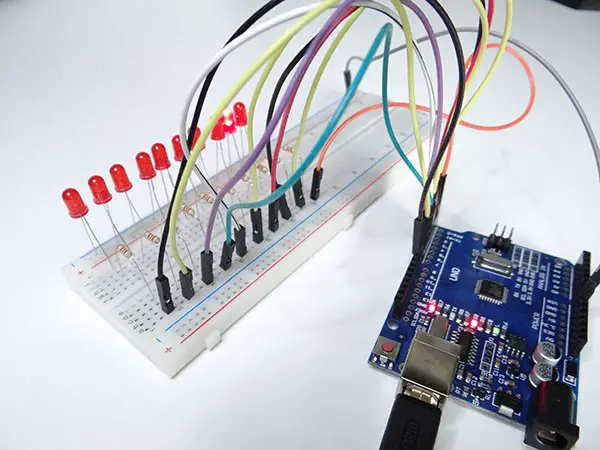
Now we can upload a program. Just keep in mind that when you want to upload the program, you have to disconnect jumper wires from pins 0 and 1 because they are shared with the UART communication pins RX and TX. It is impossible to upload a program on the board when LEDs are plugged into these pins.
After uploading, you should see the Knight Rider come to life. You can change its speed at the beginning of the code by changing the time_between_blinks value. You can also try to add more LEDs or change the code to make it more yours. For example, you can try to turn on 2 or 3 LEDs at once instead of just one.
You might also like:
- Arduino hx711 tutorial
- Arduino magnetic switch
- Best Arduino Kits
- gifts for engineering students
- gifts for engineers
- mpu6050 Arduino projects
- Current sensor Arduino
- Soil Moisture Sensor With Arduino
- Arduino Count up Timer Using the Nokia 5110 LCD
- Arduino Yun: Integrating or Juxtaposing Arduino with Linux
- Arduino Projects: Line Follower Robot
- Arduino RFID Project for Beginners
- Arduino MOSFET Project
- Which Arduino Should You Buy
- What Can You Do With Arduino Boards?
- Great Alternatives to the Arduino Microcontroller
- Arduino Projects: Color Sensor
- Arduino IDE Alternatives
- Arduino Mega vs. Uno
- Arduino Projects: Arduino LCD Display
- Read Arduino Rotary Encoders
- A Selection of the Best Arduino Simulators
- Arduino Projects: IR Receiver
- Arduino Light Sensor Project
- Arduino Projects: Arduino Decibel Meter
- Arduino Stopwatch Project
- Arduino Bluetooth RC Car Project
- Arduino Temperature Logger Project
- Arduino Projects: Arduino 7 Segment Display
- Arduino Projects: Clap ON Clap OFF Light
- Arduino Relay Project
- How to install Arduino Library
- Rain Sensor Arduino Project With Buzzer
- Arduino Projects: RGB LED Arduino
- Arduino Stepper Motor Project
- Arduino Projects: Arduino DC Motor Control
- Best Arduino robot kit
- Arduino 3D Printed Case
- Arduino Projects: Asynchronous LEDs Blink
- Arduino Projects: Ultrasonic Distance Sensor
- Arduino Projects: LED – 4X4X4 LED Cube
- Arduino Car Projects: Build an Obstacle Avoiding Robot With Less Than $30
- Arduino Projects: Servo Potentiometer Control
- Arduino LED Project: Knight Rider
- Arduino Projects: PIR Motion Sensor
- The Difference between Arduino and Raspberry Pi
- Top 9 Books Every Engineer Should Read
- Top Used Sensors for Arduino
- First Hand on the Arduino Uno Board
Related posts:
 Arduino Projects: Building an Arduino Countdown Timer
 Arduino Projects: LED – 4X4X4 LED Cube
 The Best Arduino Starter Kits
 Arduino Projects: Ultrasonic Distance Sensor
 How to Install a Library Onto the Arduino IDE
 Arduino Projects: Building a Mini Arduino Shield With KiCAD – Part 1
 Arduino Barometer Project Using BMP180
 The Top Alternative IDE for Arduino You Should Start Using Today
Great! easy one